

Gems Bonanza
By pressing play, you agree that you are above legal age in your jurisdiction and that your jurisdiction allows online gambling.

Gems Bonanza
RTP96.51%
VolatilityHigh
Max winx10,000
Lines20
ThemeAncient civilizations
ReleasedOct 2020
Live game stats
Real RTP55.41%
Spins211
Players1
Biggest win$6.14

Gems Bonanza Guide: Cluster Pays, Gold Fever Buy and Real 500-Spin Test
Gems Bonanza is a high-volatility Pragmatic Play cluster slot where an 8×8 gem grid, tumbling wins and hidden modifiers decide whether the session crawls or explodes. Wins need 5 or more connected matching gems, Gold Fever is the main chase round, and the 100x buy can still miss its cost. My test found plenty of movement, but the balance still slid when the natural bonus stayed away.
Key takeaways
Gems Bonanza is a high volatility Slots game from Pragmatic Play with 96.51% RTP and 10,000x Max Win, expressed as 10,000x the bet. Wins come from clusters of 5 or more connected matching gems on an 8×8 grid, with Gold Fever as the main chase round. Volatile cluster-slot fans get tumbling wins, no fixed paylines, and a 100x bonus buy that cost $200 at my $2 stake.
- Play note: Buy Gold Fever starts the feature for 100x stake, but my $200 test returned $89.60, so don’t treat the buy as a profit shortcut.
- RTP / volatility: Gems Bonanza has 96.51% RTP with high volatility, so the math can feel swingy even when small clusters land often.
- Max win: The official Max Win is 10000, or 10,000x the bet.
- Core mechanic: Wins come from clusters of 5 or more matching gems on an 8×8 grid, not paylines.
- Bankroll note: My 500-spin test lost $417.10 at $2 stake without a natural Gold Fever trigger, so smaller stakes make sense if you want to ride out dry patches.

Table of Contents
- How Gems Bonanza Works
- Cluster pays
- Tumbling wins
- Theme & First Impressions
- Temple setting
- Table feel
- Symbol Pay Values
- Top gem values
- Gold wilds
- Spin Features Behind the Gems
- Hidden marks
- Modifier types
- Gold Fever Levels
- Fever trigger
- Level structure
- Buy Gold Fever
- Buy cost
- Test result
- How It Played in 500 Spins
- Session setup
- Balance drift
- RTP, Volatility & Our Test
- Simulator projection
- Our 500-spin session
- Bankroll Notes From the Test
- Stake sizing
- Bonus-buy budget
- Frequently Asked Questions About Gems Bonanza
- Final Thoughts
How Gems Bonanza Works
Gems Bonanza works as a cluster-pays slot on an 8×8 grid, where 5 or more matching gems must connect horizontally or vertically to pay. The Gems Bonanza slot has no fixed paylines and no fixed ways to win, so you need to think in linked blocks rather than lines. I like that shift, because it makes you watch the whole board instead of only the left side.
Cluster pays
Clusters count when matching gems touch horizontally or vertically. Diagonal contact doesn’t count, which matters when you’re one symbol away from a larger group. You’ll see plenty of small clusters, but bigger blocks need either lucky drops or help from wilds and modifiers. The 8×8 shape also leaves room for clusters to form in the middle of the board, not only near the edges.
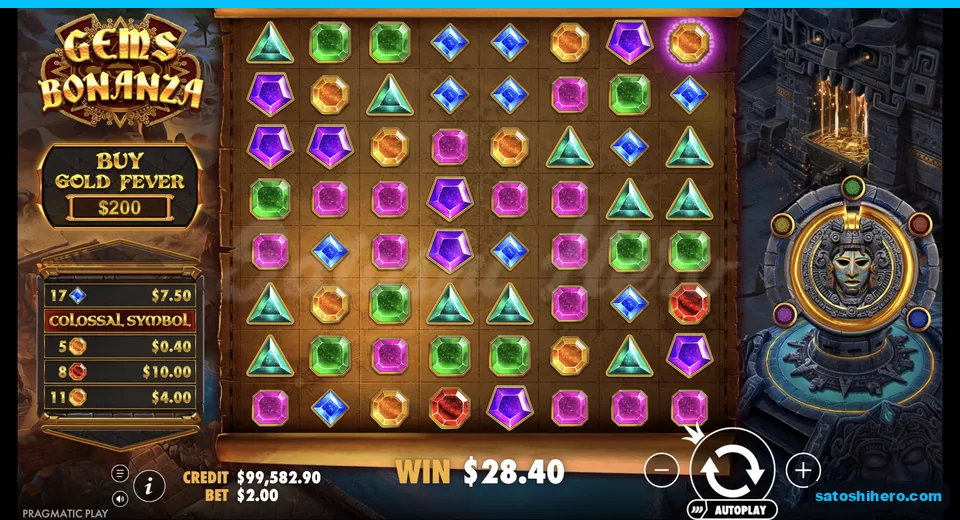
The game reads clearly on desktop and mobile because the grid, balance, stake and feature cues stay visible. That helps you track the board without squinting, especially when tumbles start moving fast. I think the clean layout does more work than the theme here.

Quick Fact: This is a cluster-pays slot, not a line slot, so the payline count doesn’t describe how wins actually land.
Tumbling wins
Tumble is the base engine. Winning gems explode, symbols above fall down, and new gems drop into the empty spaces. The process keeps going until no new paying cluster appears.
You should also watch the side-panel feature cue during every tumble. Hidden colored marks behind gems can turn a plain win into a modifier trigger, and that’s where the base game gets sharper. Don’t click away after the first cluster, because the last drop may matter more than the first hit.
Theme & First Impressions
The theme is a warm gem-mining temple scene, and it works best because the symbols stay readable during busy cascades. You get torchlit stone, a glowing ancient entrance, and a stone Medusa-style wheel turning beside the board. I don’t think the setting breaks new ground, but it does keep the action clean.
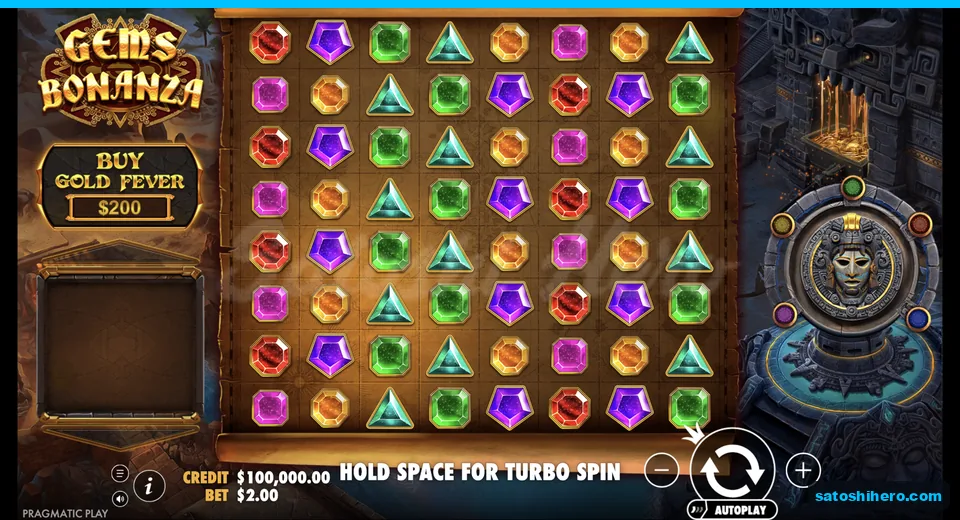
Temple setting
The gold palette fits the treasure-hunt setup without drowning the gems. Red, teal, purple and blue shapes stay distinct, which matters when clusters fire in quick waves. You can follow the board even when wilds and blocks start landing.
Sweet Bonanza brings brighter candy energy and a softer visual mood, while this game leans into stone, firelight and mining-temple grit. That contrast helps if you know Pragmatic Play’s tumbling style but want a less sugary presentation. I prefer the readability here, even if the theme feels less playful.

Did You Know? The Medusa-style stone wheel gives the temple scene a mythic treasure-hunt feel, even though the core symbols stay simple cut gems.
Table feel
The calm backdrop hides a busier system than the art suggests. Once modifiers start firing, the board can flip from quiet to chaotic in one marked win. That mismatch gives the game more tension than the mining theme alone.
Screenshots and test notes are checked regularly when the live game presentation changes. That matters because small UI changes can affect how quickly you spot feature cues. In play, the grid looked calmer than it felt, and I think that’s part of its hook.
Symbol Pay Values
The red octagon pays the most, while gold wilds matter because one wild can connect more than one cluster at once. At my $2 stake, the red octagon pays $2,000 for 25 or more connected symbols. The purple pentagon follows at $1,000, then the green square at $600 and the teal triangle at $300.
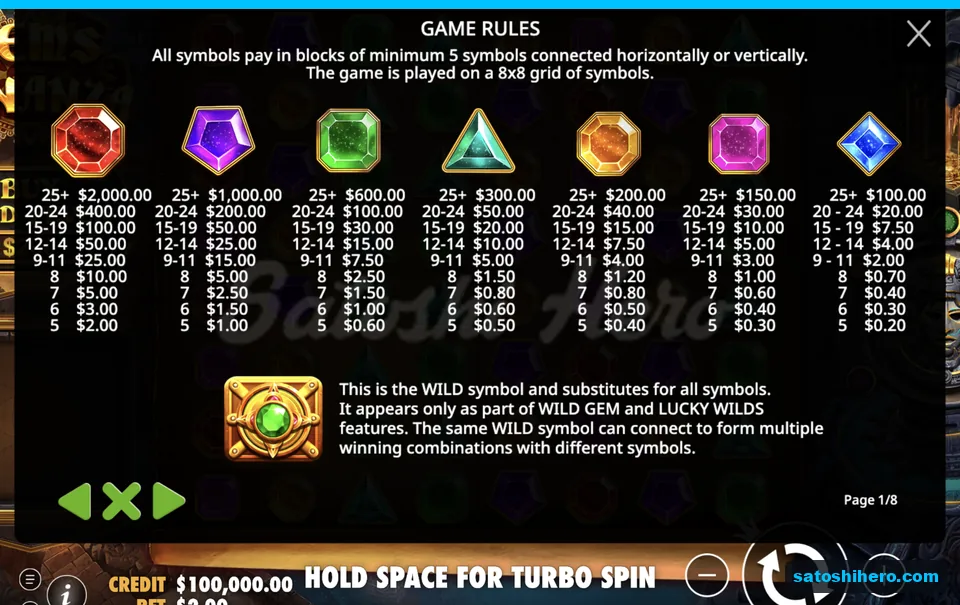
Top gem values
The lower high-cluster prizes still matter. Orange octagons pay $200 for 25 or more, pink squares pay $150, and blue diamonds pay $100. Smaller clusters pay down to the 5-symbol minimum, so the board can keep moving without creating a meaningful profit.
I’d check the paytable in Gems Bonanza free play on SatoshiHero before staking real money. The ladder has enough steps that guessing from symbol color alone can mislead you. Big 25-plus clusters look great, but you’ll mostly see smaller connected groups.
Gold wilds
The gold gem is the wild, and it substitutes for every regular symbol. It doesn’t appear naturally in the base grid. You only see it through Wild Gem and Lucky Wilds, which makes those modifiers feel more important than simple visual effects.
One wild can connect several clusters at once. That can turn a modest tumble into a better one, especially when the board already has matching groups close together. I don’t expect wilds to save every cold spin, but they give the slot its best base-game spark.
Spin Features Behind the Gems
The spin modifiers behind the gems create most of the base-game movement before Gold Fever appears. Hidden colored marks sit behind symbols, and a winning cluster on a marked space triggers the matching feature. The base game can look flat until one marked win starts a chain.
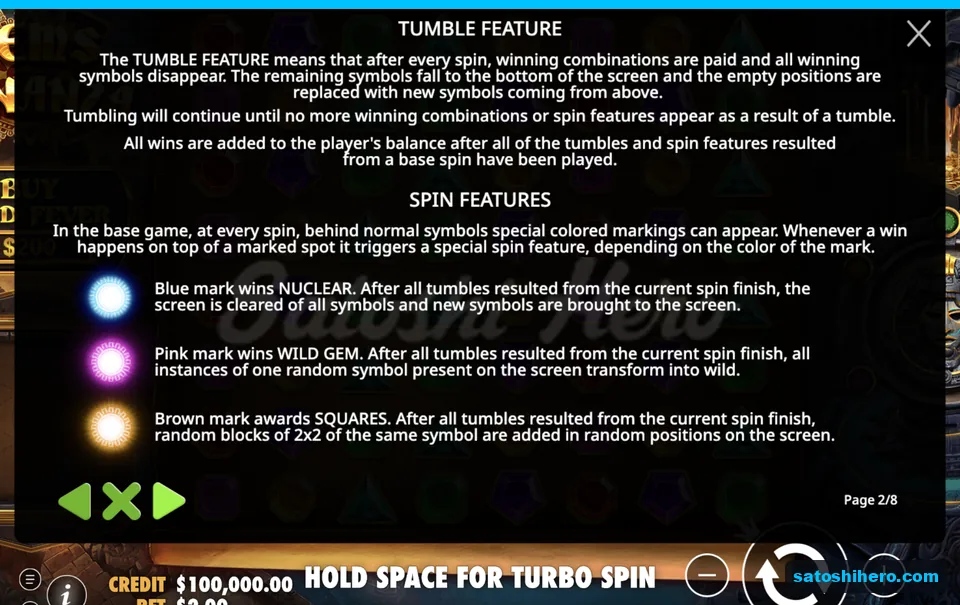

Modifier types
The five modifiers each push the board in a different direction:
- Blue Nuclear clears and refills the board.
- Pink Wild Gem turns every copy of one random gem into a wild.
- Brown Squares drops 2×2 blocks of one gem.
- Red Colossal Symbol adds a 3×3, 4×4 or 5×5 block.
- Green Lucky Wilds scatters 5 to 15 wilds.
In my session, these features kept the board alive without always saving the balance. A Colossal Symbol drop gave me the cleanest visible lift, worth about $28. That felt good in the moment, but it didn’t change the wider downtrend. The stronger modifiers mattered most when they created fresh clusters after the first payout, because a single marked space alone did not guarantee a strong total.
Gold Fever Levels
Gold Fever is the main chase feature, triggered by collecting 114 exploding gems in one base spin. Every base spin counts gems that explode during its tumbles. Hit the 114-gem target in that single spin, and the round starts.
Fever trigger
The trigger sounds simple, but it asks a lot from one spin. You need enough clusters, tumbles and follow-up drops to build the meter before the sequence dies. My 500-spin run never reached a natural Gold Fever trigger, which says plenty about the wait.
That wait adds tension to slow base-game stretches. Even small wins can feel useful if they keep the tumble alive and push the meter. Still, I wouldn’t call the feature easy to reach from normal spins.
Level structure
Gold Fever runs in levels. All five spin modifiers appear once per level, and every win carries a multiplier that starts at 2x. Collect enough gems inside the level, and you climb higher.
That structure gives the round a better sense of progress than a simple free-spin count. You’re watching modifiers, wilds and the multiplier at once. I like the design, though the base game can feel like a slow bleed while you wait for it.
Buy Gold Fever
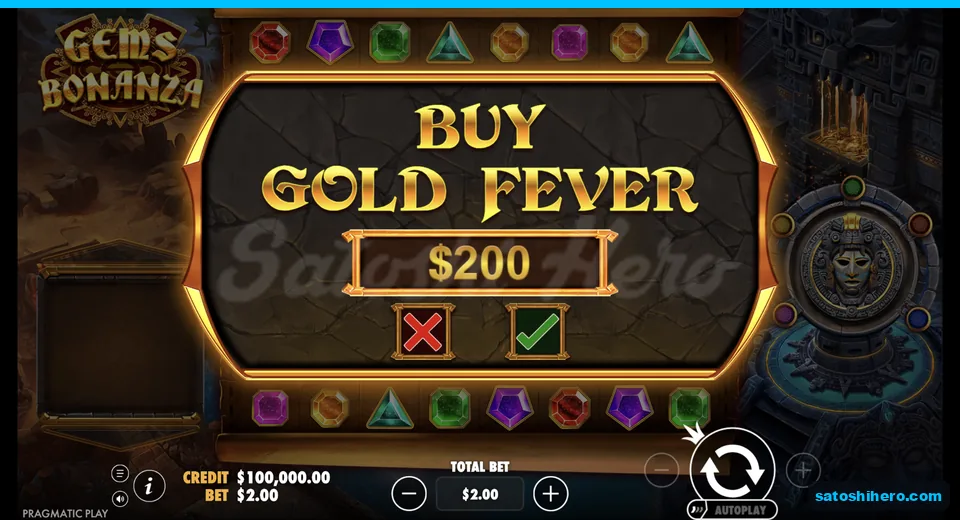
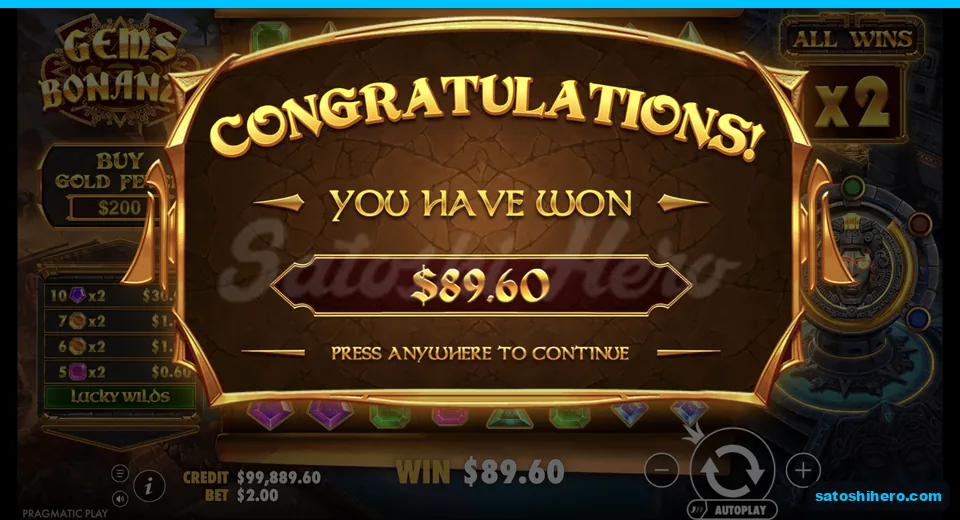
Buy Gold Fever costs 100x the bet and jumps straight into the bonus, but my $200 test paid only $89.60. At the $2 stake, I clicked the BUY GOLD FEVER sign on the left rail and confirmed with the green tick. The feature opened at level 1 with “ALL WINS 2x” active from the first spin.
Buy cost
The buy skips the slowest part of the game. That makes it tempting when the base grid keeps paying tiny clusters without a real spike. I get the appeal, because waiting for 114 exploding gems in one spin can test your patience.

Caution: A 100x buy can still return less than half its cost. Treat it as a high-volatility shortcut, not the default route.
Test result
During my bought round, Wild Gem and Lucky Wilds both fired. Glowing gold wilds landed across the grid, and every cluster paid with the 2x multiplier. The screen looked active, but the final payout landed at $89.60.
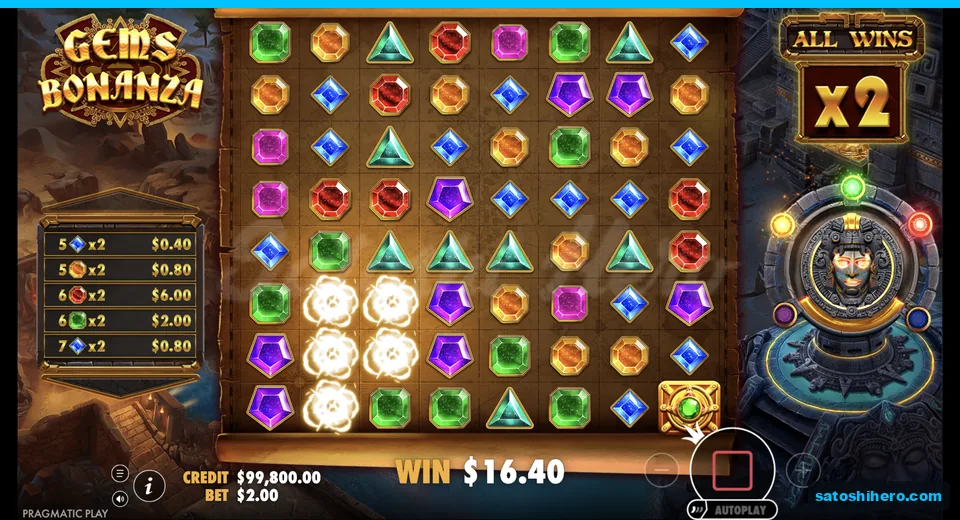
That equals about 45x the bet, which sounds decent until you compare it with the $200 buy cost. I don’t dislike the feature, but it needs strict limits. The buy feels exciting because it skips the wait, not because it creates a safe route to profit.
How It Played in 500 Spins
The 500-spin Gems Bonanza demo test drifted down $417.10 at $2 stake, mainly because no natural Gold Fever round arrived. I used Turbo mode from a fresh $100,000 demo balance. The session finished at $99,582.90, which gave me a clear loss despite regular small hits.
Session setup
I ran the test in demo mode so I could focus on pacing without changing stakes. Small cluster wins landed often enough to keep the board moving. Several spin features fired, including the Colossal Symbol drop worth about $28.
This demo/free-play style test on SatoshiHero helps you understand pacing before switching to real play. I think that matters with this slot, because the base game can feel active while the balance still slides. Cash Bonanza has its own feature rhythm, but this title felt more like a cluster grind with sudden modifier flashes.
Balance drift
The balance line told the real story. Small wins slowed the fall, but they didn’t stop it. No full Gold Fever trigger landed naturally, so the session never found the larger feature-led spike it needed.
That’s the lesson I took from the run. You can see gems exploding often and still lose ground over hundreds of spins. If you play this one, don’t confuse movement with momentum. The most dangerous stretch was not a dead run, but a run where regular tiny clusters made the loss feel less obvious.
RTP, Volatility & Our Test
Gems Bonanza has 96.51% theoretical RTP, high volatility and Max Win 10000, so the upside exists but the ride can get rough. The 10,000x the bet ceiling gives the slot a real target, yet the path there runs through dry patches, modifiers and Gold Fever. Small clusters may land while your balance still drops.
Simulator projection
The SatoshiHero Slot Simulator ran 1,000 spins at the $2 stake using the published 96.51% RTP, high volatility and 10,000x ceiling. The median modelled session finished about $128 down. The p5 to p95 band ran from roughly $635 down to $738 up.
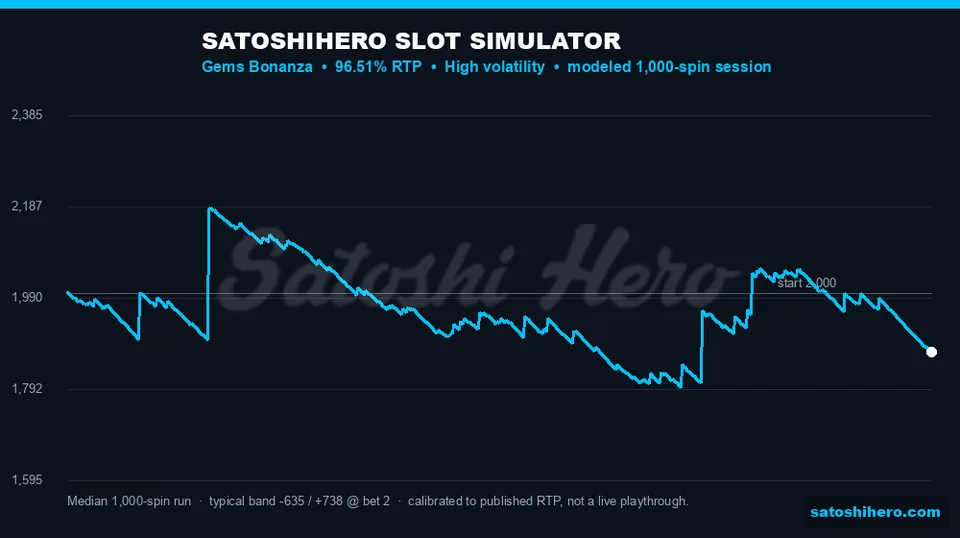
Quick Fact: High volatility means the game can show regular small wins while still waiting for one larger feature-led spike.
The model placed a feature around 1 in 45 spins and a 100x-plus hit around 1 in 1,742. Those figures show why the game can feel lively without producing a major lift. The model can’t predict your next session, any RNG result, or the timing of Gold Fever.
Our 500-spin session
My real 500-spin session matched the swingy feel in a harsher way. I played at $2, finished $417.10 down, and never triggered Gold Fever naturally. Spin features fired, but no spike reversed the drift.
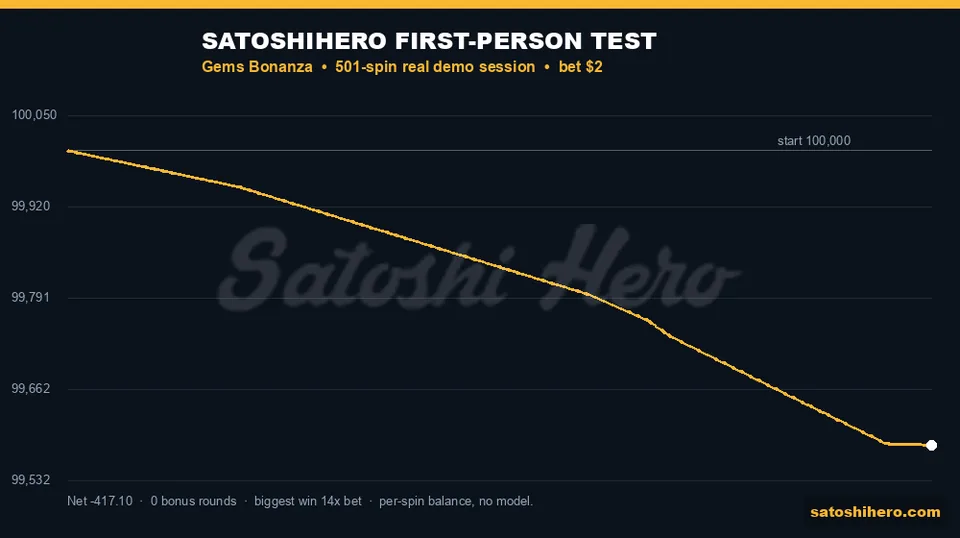
That result doesn’t make the official RTP wrong. It shows how high volatility can feel when the big feature stays away. I think this section matters more than a generic RTP line, because the loss came through active-looking spins rather than dead screens.
The theoretical RTP is the operator’s published return figure. A single live or demo session doesn’t change that figure, and bonus-buy RTPs or feature RTPs may differ slightly from the base setup by design.
Bankroll Notes From the Test
The test suggests smaller stakes make sense if you want enough spins to wait for Gold Fever without letting one dry run dominate the budget. My 500 spins at $2 lost $417.10, and no natural Gold Fever round arrived. The separate $200 buy returned $89.60, which made the risk feel very real.
Stake sizing
Small clusters can keep the board active while the balance trends down. That’s the main bankroll trap here. You feel involved, but your total can still slide if the feature system doesn’t connect.
I’d rather lower the stake than shorten the session. More spins give you more room to see the modifier system without forcing big buy decisions. Gravity Bonanza may appeal if you want another Bonanza-style feature profile, but this grid asks for patience with tumbles and hidden marks.
Bonus-buy budget
The 100x buy should sit outside your normal spin budget. If you mix buys into the same bankroll plan, one or two weak rounds can wreck the session. My bought Gold Fever round looked busy and still lost against its cost.
Demo testing helps you feel that pace before real-money play. Low-volatility stability fans or fixed-payline players may not enjoy this rhythm. If you like cluster grids, tumbling wins and modifier chains, set a firm stake and keep the buy button on a short leash.
Frequently Asked Questions About Gems Bonanza
How do you trigger Gold Fever in Gems Bonanza?
Every base spin counts the gems that explode during its tumbles into a meter. Collect 114 in a single spin to trigger the Gold Fever round, which runs in levels with all five spin modifiers and a win multiplier starting at 2x.
What are the spin features behind the gems in Gems Bonanza?
A win landing on a hidden colored mark triggers a feature: blue is Nuclear, pink is Wild Gem, brown is Squares, red is Colossal Symbol and green is Lucky Wilds. They add wilds, blocks of one gem, or clear and refill the board.
What happened in the real Gems Bonanza 500-spin session?
Starting from a fresh $100,000 demo balance, my run finished at $99,582.90, a net loss of $417.10 at the $2 stake. Spin features fired but no full Gold Fever round triggered, and the noted hit was about $28.
Was the Gems Bonanza Gold Fever buy worth it?
I bought Gold Fever for $200 and it paid back $89.60, about 45x the bet. That was a loss on the cost, which is a normal outcome for a high volatility buy.
What is the Gems Bonanza RTP and maximum win?
The published RTP is 96.51% and the volatility is high. The Max Win is 10000, or 10,000x the bet, and wins pay as clusters of 5 or more connected gems on the 8×8 grid.
Final Thoughts
Gems Bonanza stands out because the cluster grid, hidden marks and Gold Fever levels give it more life than the simple gem-mining theme suggests. Its main drawback is the same thing that gives it bite: the base game can grind downward while you wait for a real feature hit.

My Verdict
I’d play this with small stakes first and treat Gold Fever buys as occasional tests, not a regular plan. The slot gives you plenty to watch, but a typical session can still feel harsh when the meter never reaches the bonus.
I like the modifier system, especially when wilds and Colossal Symbol drops change a dull board. I don’t like how easily small clusters can make a losing session feel busier than it really is. My 500-spin test and bought bonus both reminded me to respect the variance.
Gems Bonanza is worth testing if you enjoy grid slots with tumbling wins and feature pressure. This page is updated periodically so the practical notes stay aligned with the live game presentation.

Pros:
 Clear cluster system: The 8×8 grid makes wins easy to follow.
- Strong modifier variety: Five spin features keep base rounds from feeling empty.
- Readable symbols: Clean gem shapes help you track cascades quickly.
- Useful bonus buy: The 100x option lets you test Gold Fever directly.

Cons:
 Harsh dry runs: My 500 spins lost $417.10 without natural Gold Fever.
- Costly buy risk: The $200 buy returned only $89.60 in my test.
- Plain theme: The temple setting feels familiar despite strong mechanics.

Best For: High-volatility cluster fans get the most from this game when they enjoy tumbles, hidden feature triggers and bonus-buy tension. It’s a tougher match for fixed-payline fans or anyone who wants steady low-risk pacing.





















































Bets
All Bets
Game
Player
Date
Wager
Mult.Multiplier
Prize
 Grand Koala: Hold ‘N’ Link
 mdp0fxo
- 19:04:00
- 4×
- Royal Fruits 9: Hold 'n' Link
 Hidden
- 19:03:58
- 0×
- Katana Klash: Hold'n'Link
- nina87
- 19:03:55
- 0×
- THE VIP
- bCreative79
- 19:03:54
- 0×
- THE VIP
- bCreative79
- 19:03:52
- 0.39×
- Grand Koala: Hold ‘N’ Link
- mdp0fxo
- 19:03:52
- 0.39×
- THE VIP
- bCreative79
- 19:03:50
- 0×
- Royal Fruits 9: Hold 'n' Link
- Hidden
- 19:03:50
- 0×
- Galaxy Glitter
- Hidden
- 19:03:49
- 0×
- Katana Klash: Hold'n'Link
- nina87
- 19:03:49
- 0×